Thursday, September 29, 2011

My First Baking Post

This time of year is big for our family. My dad, brother, hubby, and I all have birthdays between August and October (plus a few more extended relatives). So we spend a lot of time in the fall giving and recieving gifts, going out to dinner, and eating desserts!

Every year my dad wants the same cake for his birthday: spice cake with caramel frosting. It is so good! I like to have different things every year. It's my one chance to get exactly what I want! This year, I wanted pumpkin cheesecake, and my mom came through with an amazing one.

Well, today is hubby's birthday. Currently, this is the only fall celebration I bake the cake for, so I always look forward to it. I love to bake! This year, hubby wanted black forest cake. Cherries are one of his favorite things. Now, I've never baked a black forest cake before, but I so enjoy trying new things in my baking, so I was excited!


These days, I very rarely follow a new recipe to the letter. I'm more of a try-it-and-see, work-with-what-I-have kind of girl. I couldn't find a recipe I liked for black forest cake that used a boxed mix, which I happened to have and wanted to use. So, I got out my Cake Mix Doctor cookbook. I just love this book! Every cake I've tried out of it is wonderful! I found a good chocolate cake recipe and started with that.

Now I doubt that it's good blogging etiquette to post a recipe from someone's cookbook on your site without permission, so I'll refrain. Let's just say that there was some combining of ingredients (including sour cream and chocolate chips - yum!), some mixing, some batter in pans, and some baking :) To try it, go get the book, it's worth it!


Here's the part where I deviate from the recipe. It called for baking in a bundt pan. But since this was going to be a black forest cake and needed layers (for filling. Cherry-and-Cool-Whip-goodness filling), I had to adjust a little. Turns out it worked just fine to put the batter in two round cake pans and bake at the same temp, for the same time. Except there was a little leftover batter.


Does anyone else immediately think cupcakes?! I always immediately think cupcakes when there's leftover anything in baking. So I made two round cakes and four cupcakes in cute pumpkin liners :)

When I went to the store and got the couple things I needed for this cake, I really didn't think about the maraschino cherries being too liquidy (yep, liquidy. That's a word, right?) to work well for the filling. I'm not sure what happened there, because I thought about it when I planned out the cake and was going to get cherry pie filling, too, so it would have lots of cherry flavor, but that didn't happen. So here's what did happen. I took most of the juice from the jar of cherries and mixed it in a bowl with some of the Cool Whip, as much as I thought I might need for the filling. I figured any extra could be the icing on the cupcakes. It mixed beautifully and really tasted like cherry!


Sorry for the super blue, shadowy picture!


Then I just assembled the layers with the cherry Cool Whip and some cherries in between, frosted with lots more Cool Whip, and garnished with a few cherries. It. Was. Awesome. Seriously, this was a good cake!


So there's my first baking post! And happy birthday to my dearest love :)

Monday, September 26, 2011

Finishing Another Bathroom

Yes, apparently I'm in a bathroom sort of mood. We just finished the main bath last week, and now I'm putting the finishing touch on the half bath in our master bedroom.

Hubby and his dad remodeled this room right after he moved in, while we were still dating. So for some reason, I didn't think about putting up any decorations until just a few months ago. It's just your standard bathroom. I dream about the little changes I can make someday down the road to make it special :)


I love those walls full of embroidery hoops filled with awesome vintage fabric, so I tried to recreate that on one wall.


I'm not thrilled with the fabric, but I'll work on that in the future. I'd like for it to have more of a vintage feel. But for the other wall, I have to have something lightweight, because the pocket door frame is right there, so no big nails or screws. I thought about just doing a really big, oval hoop that I saw at Hobby Lobby with fabric. But then, I was inspired by these, which are all over Pinterest.


Love! So simple, but still so much impact! So I made my own.

I started with a 16"x20" oval canvas from Hobby Lobby, a package of wood letters for each of our initials, and a package of foam scrapbook stickers (I just love that font!).


I was going to use all wood letters, but it turned out to be a much better deal to get the scrapbook stickers, which were half off. They're all glittery, but that didn't make much difference for this project.

I usually just eyeball lining things up, but I knew that if a single letter was crooked on this thing, it would drive me crazy. So I took the time to measure and line things up using masking tape.


I tossed around a lot of ideas for the wording, but absolutely fell in love with just the word "wholehearted." It really sums up what I love most about our relationship, that we are devoted to loving each other with everything we have. Wholehearted.

So the foam letters were stickers, but I had to hot glue the larger wood letters to the canvas. You wouldn't think it would be hard, but I had to glue the B like three times. But it's on there now. Mostly.

Now, the room is mostly creams, so I wanted to add some color, rather than white. I used some spray paint I've been using on just about everything right now, Rustoleum's Slate Blue Satin. It only took one coat, then just a little touch up. Awesome!


It looks so pretty! I think it may need some ribbon to finish the edge. You can see the staples, and it kind of bugs me. I'll work on that, but I like it better than the empty space!

Friday, September 23, 2011

The Big Bathroom Renovation: Reveal!

Finally. I can't tell you how long I've been dreaming of this. It feels like our wedding day all over again: months of planning, agonizing over every tiny little detail, pouring over photos online and in magazines, hours spent working and creating. And it is so worth it! I'm giddy with excitement that I now have a bathroom that is so close to the ones in the magazines!
Here's what we started with (see the process here and here):


And here's the (almost) finished product!


Sorry for the not-so-great lighting! The curtain is an old embroidered runner that I box pleated and hung on string. The vanity is my very favorite part. After much searching and much pleading to hubby, we found a beautiful, rather beat up old dresser, marked for $75. In the process of talking to the store owner, we found out there's a lovely mirror that goes with it (which is now on my mantle), and he knocked the price down to $50! Sold!

My favorite part: the bottom two drawers are actually usable, in spite of the plumbing! Huuby did this to both drawers. It doesn't give a lot of storage, but a little is better than none!


You can see my only issue a little better in this picture:


That is not the lighting, the dresser is very yellowed. I painted it with several coats of Valspar's Cream Delight, which is actually much more white than cream. Then we applied several coats of polyurethane to the whole thing. Since we do painting in the basement, I couldn't really see the result until it was already installed. That yellowing from the poly is so frustrating to me! So at some point (probably very soon!) it will get sanded, repainted, and a new sealer will be applied. From what I've read, I believe a water-based poly should do the trick.

I have a little accessorizing to do. We need something to hold the toilet paper (can't decide whether to re-hang the normal holder, or get a floor stand), we're going to get a new shower curtain and soap dispenser, I have some prints to hang, and we have this little cutie to put up:


This is the color that vanity should be! So not yellow!

So that's the Big Bathroom Renovation! I am so thankful that it's done, that no one got hurt in the process, and that we saved money on so many things. One day I might add it up and let you know what the whole thing cost, but for now, I'm just enjoying the beauty of it!


I'm linking up this post at Remodelaholic! Go check out the other great projects there!


Wednesday, September 21, 2011

The Big Bathroom Renovation, Pt. 2

When I left off last time, we had this giant mess in our bathroom (see Pt. 1 of the Big Bathroom Renovation here):


Thankfully, that's all a distant memory now! After getting the new tub/shower intstalled and the new toilet put in, hubby worked on the new floor. I just realized how much I say "we" in these posts. "We" in remodeling posts should probably be read as "hubby"! I do very little! Anyway, new fixtures and new flooring.


Then, the giant monstrosity of a medicine cabinet came out.


Yes, that is a hole through into the bedroom. About half of the rooms in the house don't have drywall, just panelling over the studs. Oh, that's just the beginning of the fun that is our house!

Hubby drywalled that hole, and we painted the upper parts of the walls. Under that old panelling is tile glue. Oh yes, tile glue. If you've ever had experience with the stuff, it is nearly impossible to remove from the wall without damage. Several rooms in our house have this issue, so we've chosen to just cover it up! We put white beadboard up in place of it, coming up almost 4 ft. high.


This room doesn't get a lot of light, but the dark blue isn't too dark. There's enough white with the ceiling, the beadboard and trim, the doors and window, and the fixtures.

I want to show you one last piece that was in progess this whole time. I love when people turn old dressers and desks into bathroom vanities. LOVE! Hubby was so sweet and let me search every antique store in town until I found just the right dresser to create our own! Which, of course, I didn't take a before picture of. But here it is in progress:


Oh, I can't wait for you all to see it finished!

Monday, September 19, 2011

Finally, the Big Bathroom Renovation!

Our plan was to start the Big Bathroom Renovation last summer. It was the first big project we were going to attempt married. But then....


A leak around the chimney forced us to work on the living room instead of the bathroom. Sigh. We try to keep winter projects small, in case of weather issues, so the Big Bathroom Renovation had to be pushed to this summer.

But thankfully, it happened this year, and it. is. awesome. Here's what we started with. Dated, like the rest of the house.


Ugh, I do not miss that shower!

We decided, since we know we'll sell this house sometime in the not-too-distant-future, to replace the old fixtures, rather than try to fix them up. So we very nearly gutted the room.


My wonderful father-in-law came down and stayed for a weekend to help pull out the old tub and get the new one in. We discovered that the old one had literally been built into the room. They had to tear out so much of the walls to get it out! And of course, it was cast iron and weighed an insane amount. And since it's our only tub/shower, it was a weekend with no bathing for any of us...so glad it's over!

Next time, I'll show you more of the process, and hopefully at the end of the week I can reveal the finished project!

Friday, September 16, 2011

A Taste of Fall

I LOVE this time of year! And yes, I did use every possible way to make "love" stand out in that sentence! Fall is my favorite. Not just because my birthday is in September (this weekend, actually!) as is hubby's, but also because I love cooler weather, pumpkins, apples (and cider. Oh, apple cider!), cooler weather, crunchy leaves, fall holidays, cooler weather... oh, I mentioned cooler weather already? :)


I also love fall decorating. I start putting things out September 1st. I know, technically not fall yet. But I don't care! I put out plain old orange, red, and yellow fall things for September, then add in some Halloween in October, then put the Halloween away and bring out a little Thanksgiving in November. It's the season that just keeps giving!

So here's a little taste of fall around our house. It's different every year, because I get most of my decor from things that my mom grows in her garden. This year, there were not as many pumpkins (sad!), but tons of little indian corn.

Outside and the porch:


I had all the things below split up between this cabinet and the patio table, but the dog learned how to jump on the table and thought pumpkins sounded like a yummy treat :)


Here's the kitchen:


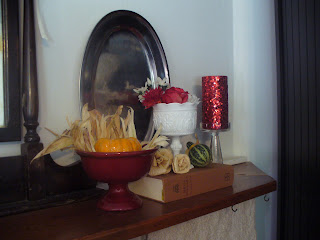
And some from the living room:


So there's some fall fun at our house. Hope you're enjoying fall this year, too!