Friday, October 28, 2011

Ellie's New Bed, Pt. 2

Earlier this week, I posted the first part of my most recent big project, a new bed for our beagle, Ellie (see pt. 1 here). To recap, we started with a nasty pile of dog bed and blanket on the floor, and a cute vintage suitcase found at a local antique shop.


So far, I told you how I tore out the old lining in the suitcase, found an awesome fabric for new lining, and attached little legs to it.


After that came the hard part: getting all that fabric made into some kind of lining and in the suitcase so that it looked halfway decent! I started on the bottom, because I knew if I messed up, it would be covered by the cushion anyway.

I cut out a piece big enough to cover the bottom and come up the sides just a little and hot glued it in.


Then I measured the sides and cut two strips of fabric wide enough to cover the side, plus an inch for a hem. I used two strips because one wasn't long enough to go clear around the sides.


I used iron-on adhesive tape instead of hemming. 'Cause I'm lazy like that :) I hemmed top and bottom on both strips, and the ends on one, since they would overlap once I attached them. I hot glued each strip around the sides. Warning: I can't even count how many glue sticks I used for this project, so I you try it, have lots on hand!


Then I repeated the process for the top, with one exception. The fabric is a little thin and I wasn't sure it would look substantial enough (it didn't matter on the bottom since it won't be seen often). So before putting in the fabric, I hot glued two layers of batting in first. It turned out just right!


And the finished product, in it's spot in our room:


I had to throw in that last one....just seconds before she jumped on me and tried to lick my camera, then pulled the blanket out of her bed and dragged it around the house. Ah, the calm before the storm :) So there's Ellie's new bed!


Wednesday, October 26, 2011

Announcing....

I'm so excited about this, folks! I'm going to do my first series of posts in November! It won't be every day, and I'll mix other posts in, but I think it's going to be so much fun!


I'm working hard this year to come up with some awesome homemade gifts for my side of the family as a way to save a little money. There are getting to be more of us, and it's getting harder and harder to buy a nice gift for everyone. There are still some gifts we're going to buy, but I've been storing up Pinterest ideas for months in anticipation of making quite a few gifts! I feel that everyone should have plenty of fun packages to open on Christmas morning, even if there is just something small inside.

So through the month of November, I'm going to be making Christmas gifts and showing you the process and results! Very few of these are things I've come up with on my own, so I'll also show you the inspiration behind each gift.

I'm thrilled and can't wait to get started. I hope you'll all enjoy My DIY Christmas!

Monday, October 24, 2011

Pinterest Again?!

I feel I owe you all an apology. The inspration for almost every single project I do these days comes from Pinterest. I am sorry if the word Pinterest starts to get on your nerves, if you start to notice that the vast majority of my post titles contain the word Pinterest, if you get an urge to cover your ears and scream every time you hear Pinterest because of my blog. I just can't help it! So forgive me, but here is yet another project I saw on Pinterest :)


This is the lovely sight that used to greet me every time I walked into our bedroom. A squished-down-to-nothing, torn up, worn out dog bed with a ratty blanket thrown on top. And periodically, our sweet beagle, Ellie (yes, my blog is named after my little love!) would pull her bed out into the hallway and proceed to tear a hole in a seam and pull out the stuffing. Fuzzy greenish stuffing. Which in turn would get spread clear through my entire house, sticking to everything fabric it came within 10 feet of. Is anyone sensing my dislike of this situation?


Enter Pinterest. I saw this delightful idea one day and thought "oh that's cute, but she'd probably hate it." My Ellie is a bit picky about her bedding. Plus, at the time I thought I wanted to get a stack of old suitcases to make into a bedside table on my side, which is right by her bed (the table by the bed in the picture above is part of my birthday gift from hubby and came after I got the suitcase for Ellie. The old table was awful). I wasn't sure a suitcase dog bed next to a stack-of-suitcases table was the look I wanted. Maybe a little overkill. Although vintage suitcases are super cool. But still.

The more I thought about it, the more I realized Ellie would probably love it. She loves soft, comfy, warm things. She loves jumping up into things. She gets cold at night on the wood floor in our room, even through the dog bed and blanket. Then I saw a lovely blue vintage suitcase at an antique store that usually overprices things a bit. Marked $12. Hubby and I went out later that week and looked at another store where we usually buy our old junk antiques and every suitcase there that was the right size, hard-sided, in nice shape, and old enough for me was also at least $20. Most were nearing $35. So went right back and got the blue one.


Isn't it pretty?! But oh yes, that is some awful pink lining! Actually, it might not have been so bad if it wasn't completely water stained and musty. Still, once I got the stuffed dog bed down in it (I wanted to use an old pillow, but she wasn't having it!) and she got used to the smell, Ellie jumped right in and happily laid right down. And the rest of the evening, whenever hubby or I got up, she ran into the bedroom, jumped in her new bed, and waited for someone to come in and say it was time for bed! It was too cute.

Anyway, I lived with the lining for awhile, wondering if I could keep it. I have trouble redoing things that are original sometimes. I'm a conservationist at heart. But the musty lining had to go. I have to admit it was pretty fun to tear out, although dusty and gross.


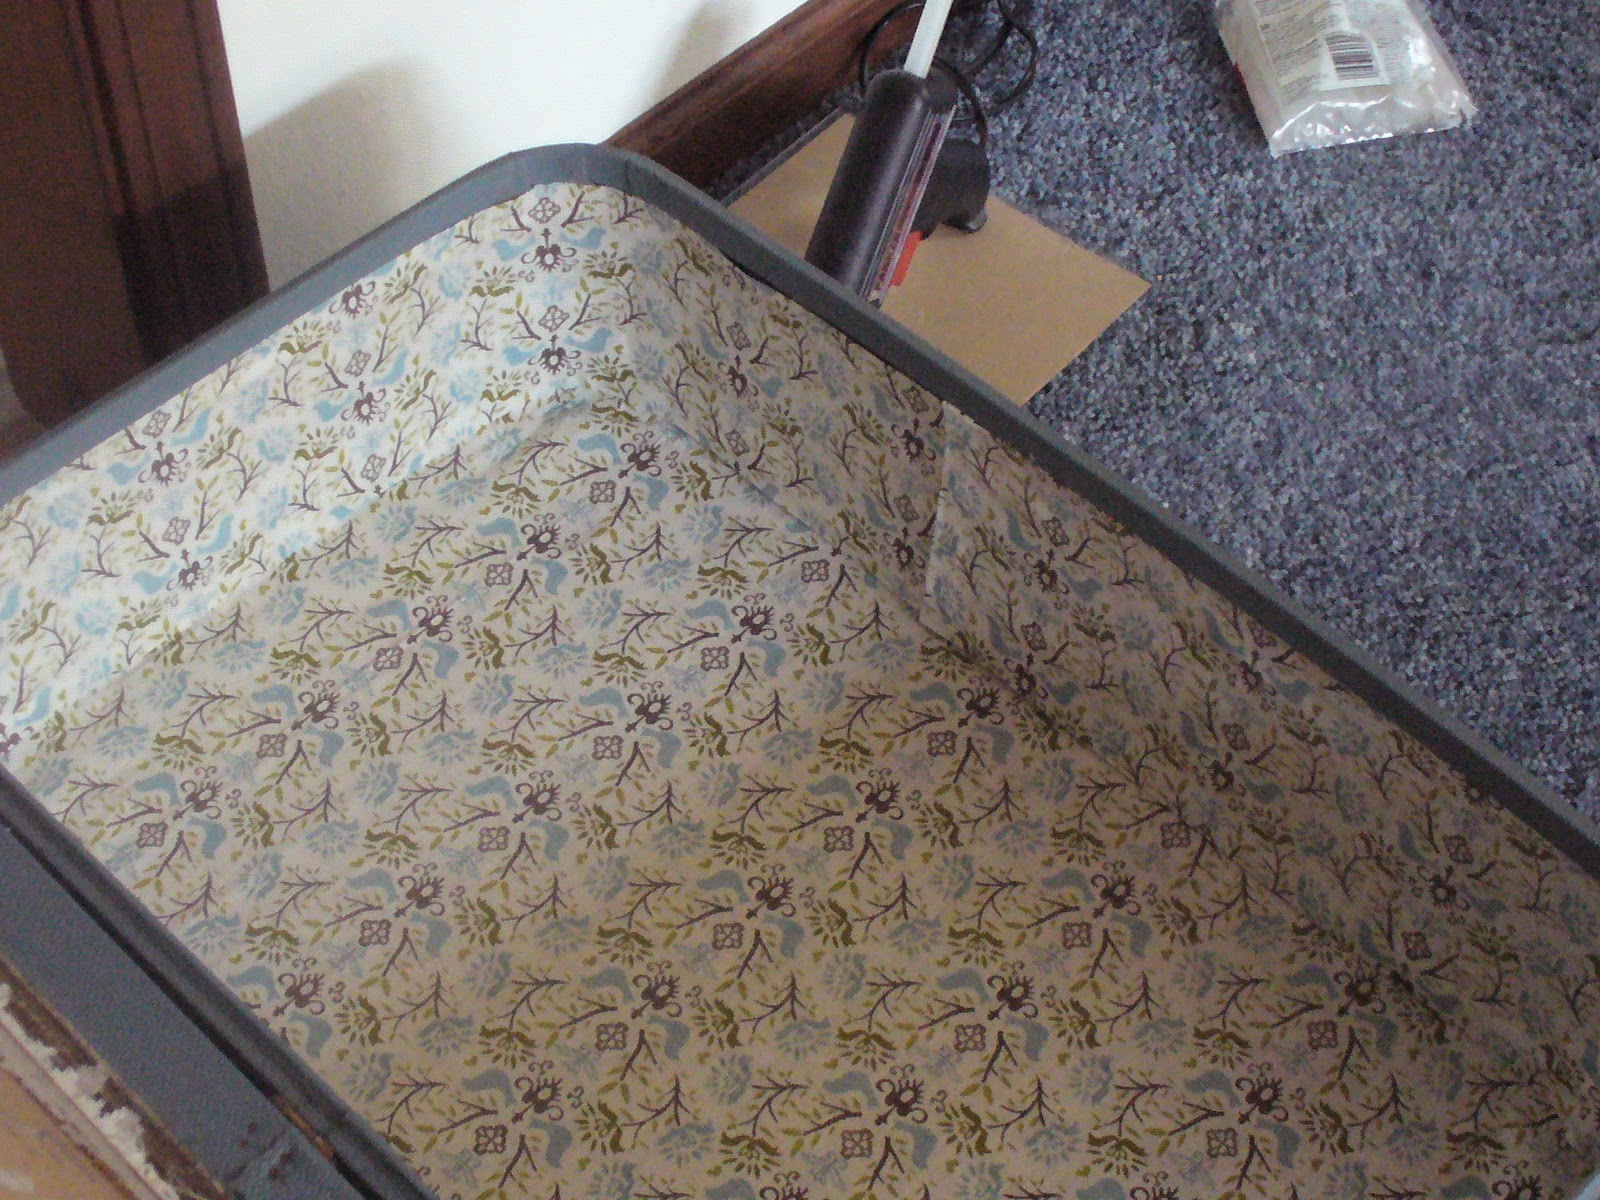
Then time to find fabric. I was stalled at that stage for several weeks. I'm getting better, but sometimes choices overwhelm me. I had to go home several times and just look at the suitcase in our room and visualize what I wanted it to look like. But I finally found a beautiful fabric that I'm just crazy about at Jo-Ann Fabric. To me, it feels vintage and current at the same time. It matches the colors in our room perfectly, as well as the other fabric I have on some accents in our room.


Ah, I could stare at that all day! I also picked up some little legs at Lowe's. They're by the trim section, and I believe the ones I got were around $1.50 each. I sprayed them with Krylon's Ivy Leaf. Love the color, not sold on the paint yet. I thought I'd used Krylon before and liked it, but I had problems with coverage this time. But once it's on, the result is beautiful! Hubby was sweet enough to attach them for me.


I was going to do this project all in one post, but it's getting a little long here! So, I'll leave it here and show you the rest next time!

Thursday, October 20, 2011

DIY Failures

I don't admit this often. Usually, I just throw the thing in a closet when people come over. Or cover it with something, anything. Or dance around to draw attention away from it. Ok, maybe I don't go that far. But I have this lamp.


It doesn't look so bad in the picture, but in person, sitting in my living room, I hate this lamp. It used to belong to hubby's parents, who gave it to him when he moved out, oh, about 12 years ago. When he moved into this house, it went in the attic. Of course, it was shiny bronze, and you wouldn't believe the awful lamp shade that was on this thing. It screamed 1970's. When I pulled it out of the attic, the shade promptly went in the garbage, and the spray paint came out. I was trying to do it cheap. Hubby suggested his stash of model car spray paint. I was thrilled with the choices! We decided on an antique white.

I got it painted (badly, even after a half dozen coats. You can't look too closely at anything in my house). Bought the one lamp shade we both agreed on. I don't have a picture of that stage, but it. was. so. country. What was I thinking, dark red and off-white?! Of course it would be totally country!

For the sake of frugality, I lived with it for a good long while. Then we got a matte nickle spray paint for the hardware on the bathroom vanity. I'm not too fond of the color on those, but I thought it couldn't be too bad on the lamp. Maybe it would help the shade look better.

Fail. Serious fail. I hardly ever use this term, but I would consider this an epic fail. Something about this lamp rejects looking good in any shade. It is the bane of my existence at this point. I have an idea for sprucing up the shade, and I'm thinking maybe some black spray paint on the lamp? I should probably go with oil rubbed spray paint, but I'm still trying to be cheap. I think I may just be stuck with a bad lamp until someday I manage to convince hubby it needs a new shade (and we need to spend good money on it).

I say all this to encourage others out there who may get frustrated with diy failures. Along with the saga of the bad lamp, I have also been having spray paint issues recently. It seems like half the things I try to spray get totally screwed up with cracking paint or something gets in the paint and messes it up, and it all goes downhill from there. I currently have several projects waiting for a magic idea that will fix the terrible paint job.


Look at that cracked paint! There are three layers of different cracked paint on that thing!
But for me, that's part of diy. Sometimes, you mess up. Sometimes, you make a bad color choice. Sometimes, things don't turn out the way they looked in your head. Don't get frustrated and give up! Surf Pinterest, get an idea for fixing it, and try again! That's part of the joy of diy: trying things until the project is absolutely perfect, absolutely you!

Monday, October 17, 2011

A Quick Free Project

Last week, Jen from IHeart Organizing issued a challenge: organize something completely for free. Now that's my kind of challenge: organizing and free! Here's what I came up with.

When we remodeled our bathroom (read about The Big Bathroom Renovation here), we put in new shower walls that had shelves built into them. I was pretty glad to get rid of the old hanging shower organizer, but it was nice and I didn't want to just throw it away. We don't have a second shower in our house, so I got creative.

For having been built in the 1950's, our house has tons of closet space. I have this great closet in the hallway that we've always used for cleaning supplies, but it got to be a mess, with things just thrown in and tons of almost-used-up cleaning stuff jumbled together. Did I take a before shot to show you? Of course not, I can't even seem to remember that part! But I think you can imagine what can happen in a space like that over time without a good system.

I always have 3M hooks around in all sizes. I can hardly do anything without them, especially for holidays! So I used some of those to organize the handled items.


Then I straightened up the shelf and the other items on the floor. Lots of stuff went out of the closet, which helped a lot!


Then, my favorite part. I took the old shower organizer, used some ribbon to hang it on the bar in the closet, and put the things I use most in it. I also used a little hanger to hang the cloth I use on my mirrors, so it can dry out after I use it.


The shelf is just a bit high for me, and this allowed me to keep the most used things in easy reach, while keeping the next most used things in front on the shelf. No more stretching up on tiptoe to reach something I need every couple weeks on the very back of the shelf! And best of all, FREE!

Thursday, October 13, 2011

What We've Been Up To

This has been a really fun extra long weekend for us. Because they were moving into a new building and at the same time adding tons of new clients, hubby's work encouraged everyone to not take vacation days during the summer if possible. It's been a very busy, stressful few months for him! But he was able to schedule a few days off this week, and it was such a blessing.

First on the schedule of fun was hubby's birthday gift from my parents. They're planning to do a big, fun surprise for my brother and I and each spouse for a birthday in the next couple years. Hubby was up first: Indianapolis Colts tickets!!!


Hubby LOVES football. He pretty much jumps up and down when that first game in September comes around. We watch every. game. possible. I don't mind football. I enjoy just about every competitive sport once I get into it and understand the rules, so it's ok with me. My mom could hardly contain her excitement when they found out there was going to be NFL football this year. She literally got online and ordered the tickets the minute she saw it on the news!


We don't live too far from Indy, so this was a great day trip for us. Neither of us had been to the new Lucas Oil Stadium yet. I'd been to the RCA dome, and never liked it. But this....beautiful. Didn't think that could describe a football stadium? When you first walk in those doors and see the roof open (it was the most beautiful day and the roof was actually open, which I guess doesn't happen all the time) and the field laid out and all those windows, it's actually beautiful.


It was such a fun day. Sure, the Colts lost. Again. But it was so fun to get out and do something exciting, just the two of us. I know we won't be able to pick up and go for the day very easily in the future!

Yesterday we decided to do one of those things we love to do, but couldn't this yet this year. There are lots of those things. We love to go to museums and zoos, state parks for hiking, and drive to a different town and check out the shopping. We chose the Indianapolis Zoo this time.

I've never been during the week in the fall, and it was great, crowd-wise. I was a little disappointed that we spent so much to get in, then most of the little carts and food places were closed and there were very few interpreters around. But there were also very few misbehaved kids, so I guess it's a trade off! I kind of wish we would have gone to the Ft. Wayne Children's Museum instead. If you're close and have never been, try it out. It's great for adults as well as kids and so interactive. I think their displays are better, and it seems like they have more animals, although they may not really. But it's awesome.


The good thing about it being so quiet was that the animals were very active and would come right up to the glass. And there weren't so many people that we couldn't see them up close and personal. I loved that warthog up there! Such a funny little guy.

Overall, it was such a fun time and it was great to have time to reconnect with each other. We're kind of busy these days, running in different directions so often. Please ignore hubby's goofy smile in this photo, he was trying to aim the camera :)

Monday, October 10, 2011

Fall Fun Days

I'm taking a few days off this week to spend time with hubby. He wasn't able to take any time off work this summer, so we were pretty much home bound between that and all the weekends we worked on the bathroom! I'll be back at the end of the week, probably with some fun pictures of our adventures!

Friday, October 7, 2011

So Exciting!

I got a pleasant surprise this morning....Jen from iheart organizing included my post on our bathroom organization in her Reader Spaces post today! Go check out some of the other awesome things people are doing with their laundry, mudroom, bathroom, and entry spaces!

A Confession and Spooky Touches

I have to admit something about this week: it's been rough, as far as blogging goes. I've felt pretty low about my abilities and level of interesting. Mostly, blogging is fun and exciting for me. It motivates me to push through and complete projects. It gives me an outlet for sharing the creative things hubby doesn't care to discuss in detail. It pushes me to step out of my comfort zone and share things I wouldn't normally point out to people. But sometimes, I can get frustrated. My photography skills and the capabilities of my cheap camera in no way do justice to how things actually look in my home. I wonder if the things I come up with, or more often, that I copy from someone else, are interesting to anyone besides me. It's been one of those weeks. But for me, that's part of what blogging brings to my life. Normally I would quit something when I start to feel this unsure. But I'm not quitting this. I'm pushing through. Hopefully, that push will make this blog continually better! Now for some fun!

Growing up, my family never participated in Halloween. I've never been trick-or-treating. We didn't have ghosts in our yard or jack-o-lanterns on the steps. I didn't really miss it, because there was so much fun fall decor in our house. We usually went to a "harvest party" at church, or mom took us out of school during the class party time and we got treat bags she made. Until I met hubby, who loves Halloween, the holiday wasn't part of my thought process. I'll tell you, I'm still not into witches and ghosts, but I don't mind sprucing up the fall stuff with some spookier items!


So here's a glimpse of Halloween at our house. I try to keep it on the prettier side and not go all cheesy or completely scary and gross. But I do like a little spook.


This sign is on our porch. I just started hanging a sign out there this summer, and I love it! Why did I never think of a sign outside before?!


On our table. You can't tell in this picture, but all the little pumpkins have glitter on them! I love glitter!


These are not the best pictures. Sorry for that, I can't seem to get enough light on this side of the living room! But you get the idea. And yes, those are little paper rat silhouettes. I found a package at Dollar Tree this year and was so excited! I saw them around blogs last year and loved them on stairs. I thought I would put them around the floorboards and in some of the windows at our house.....until I put on up on the floorboard and Ellie ate it. They were totally freaking her out! So they're all up high, but they mostly look cute.

Monday, October 3, 2011

I'm on the Drop Cloth Bandwagon

Yep, I've done it. I've jumped on the canvas drop cloth bandwagon. I'm late, I realize that. That's the usual state of my life when it comes to trends. But I'm here, at least! So here's my first drop cloth project: curtains.


So super easy. I mean, it was silly how easy this was. It took much longer to wash the material than to do all the rest combined! First, here's what I started with. I bought these blue curtains soon after we got married (hubby had no curtains in the house. No. Curtains.). I disliked them pretty much as soon as I got them up. The problem is, in my normal fashion, before buying them I missed the part where the panels were sewn to the rather ugly valence. Yes, clearly I went cheap. But I really just wanted the panels, and it was going to be way too much work to separate them. So I lived with them. Unhappily.


I also didn't quite have my style worked out yet when I got these. Shiny satiny-ness....not so much me. And you wouldn't believe how much lighter the room was when I took these down! I always wondered why the room seemed so dark.


So, a 4' x 15' drop cloth, washed, cut into 4 panels, and hung with clips made such a difference! I'll share a little secret with you: I didn't even finish the edges where I cut. How's that for a lazy project?! Now, I don't really like how the top looks with those curtain rods. They're the old white ones that curve around the window frame....I just don't think they make enough of a statement. At some point I want to get some nicer ones, but for now, it's definitely an improvement over the cheap-o curtains!